
Stack H760
The actual 3D design of the stack: Brahma H7 on Vishnu 60 PRO. Turn it over and look at it from any side.
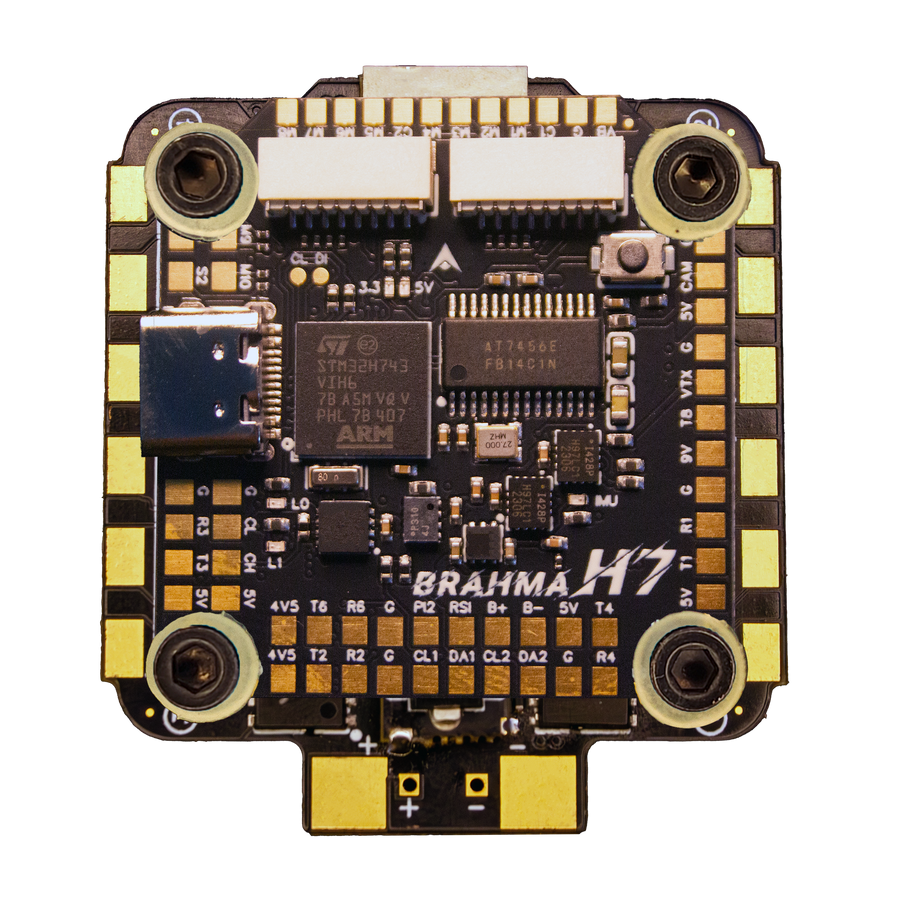
Four screws.
M3 screws come up through the frame on the standard 30.5 × 30.5 mm pattern. The same pattern on every Brahma and Vishnu.
Grommets first.
A soft TPE grommet presses into each mounting hole, so frame vibration stays out of the gyros. We injection-mould them ourselves, and eight come with every stack.
Vishnu, then Brahma.
The ESC slides down the screws first. The flight controller sits on top.
Four nuts. One cable.
An 8-pin cable links the two boards. Tighten four nuts, close the frame, and you are wired.
Same stack.
Any size.
It drops into 5, 7 and 10-inch frames, and onto a 650-class machine with our stack holder. The gold circles are the props each one swings.
Take off.
The 650-class machine lifts off on the same Brahma and Vishnu stack, with an extinguisher ball underneath.
Straight to the fire.
No road, no ladder, no one walking into the heat.
Drop. Out.
The ball goes in from above and bursts on the flames.
Now give it a mind.
Pair the Brahma H7 with an onboard computer, a Raspberry Pi, Radxa or Jetson, over UART and MAVLink. The same airframe starts deciding for itself.
Picks up on its own.
It finds the supply crate, lands over it and locks on. No pilot on the sticks.
Finds who needs it.
Vision scans the flood roof by roof until it finds people waiting.
Delivers.
Food and medicine, lowered on a line onto the rooftop.
Home. Fresh battery.
It flies back to the dock, sheds the spent pack and takes a charged one.
And goes again.
Sortie after sortie, for as long as there are people to reach.
Same brain.
New wings.
Move the Brahma H7 into a VTOL. It lifts off like a multirotor and cruises like a plane, so it can reach places a multirotor never could.
No GPS.
It still gets there.
Drop a pin far away. With a camera and visual-inertial odometry (VIO) on the companion computer, it holds its course when GPS is jammed or lost, scans the ground in 3D and sends the model home.
Illustration. Brahma H7 runs ArduPilot and PX4 and talks to a companion computer over MAVLink; the autonomy is built on top by the integrator.
One board thinks.
One board moves.
Brahma H7 flight controller + Vishnu 60 PRO 4-in-1 ESC on a standard 30.5 × 30.5 mm pattern. Keep scrolling to take it apart.
Flight controller
- MCUSTM32H743 · 480MHz
- GyroDual ICM42688P
- Ports7 UART · 2 I²C · CAN
- MotorsUp to 10
- LoggingmicroSD Blackbox
- Mounting30.5 × 30.5 · M3
Vishnu 60 PRO
- Current60A · 90A burst (7s)
- Input2S-6S LiPo or Li-ion
- ProtocolDShot300 / 600
- SensingInbuilt current sensor
- Mounting30.5 × 30.5 · 4mm holes
- Weight14g
VISHNU
60
Four-in-one, 240A continuous. Field tested and proven.
Drop in.
Flash. Fly.
Tuned as a pair and shipped as one stack, with every accessory in the box.
Stack H760 specifications
Brahma H7 flight controller and Vishnu 60 PRO 4-in-1 ESC, matched and shipped as one stack on a standard 30.5 × 30.5 mm mount.
Brahma H7 flight controller
| Processor | STM32H743, 480MHz |
|---|---|
| Gyroscopes | Dual ICM42688 |
| Barometer | DPS310 |
| On-screen display | AT7456E |
| Blackbox | microSD card slot |
| USB | Type-C |
| Firmware | Ships with ArduPilot or PX4 (your choice at order). Betaflight and INAV files are on our downloads page. |
| Power input | 2S-6S LiPo or Li-ion |
| UARTs | 7 (UART7 with RTS/CTS flow control) |
| I²C | 2 buses, for two GPS + compass modules |
| CAN | Yes, CH and CL pads |
| SPI | 2 breakouts |
| Motor outputs | 10: two plug-in ESC ports (M1–M4, M5–M8) and solder pads for M9, M10 |
| PWM outputs | 13 in total (10 motors, 2 servos, 1 LED) |
| 5V output | 3A across 9 pad groups |
| 9V output | 3A, switchable on/off from the radio |
| 3.3V output | 1A, for compasses and sensors |
| 4.5V output | Powered over USB, for the receiver while configuring |
| Digital VTX | Plug-and-play port (DJI, Walksnail and others) |
| Extras | Relay PINIO, 2 NeoPixel LED pads, RSSI, SBUS, SmartPort, buzzer pads |
| Operating temperature | −20 °C to 70 °C |
| Mounting | 30.5 × 30.5 mm, 4 mm holes |
| Dimensions | 37 × 35.5 × 8 mm |
| Weight | 9 g |
| Made in | Designed and manufactured in India (Bally, West Bengal) |
Vishnu 60 PRO ESC
| Type | 4-in-1 ESC |
|---|---|
| Continuous current | 60A per channel, 240A in total |
| Burst current | 90A for 7 seconds |
| Firmware | BLHeli_S or BlueJay (JH_50) |
| Protocol | DShot300 / DShot600 |
| Input | 2S-6S LiPo or Li-ion |
| Current sensor | Built in |
| Motors | Maximum draw below 70–80A |
| Flight controller connection | Plug-and-play 8-pin cable |
| Mounting | 30.5 × 30.5 mm, 4 mm holes |
| Dimensions | 46 × 48.8 × 5.7 mm |
| Weight | 14 g |
| Operating temperature | −20 °C to 70 °C |
| Made in | Designed and manufactured in India (Bally, West Bengal) |
Book your Stack H760
Message us on WhatsApp. We reply with availability, price and delivery time, and help you pick the right parts for your build.


Stack H760 user manual
Point at any label to see the wire and the part it belongs to. Step through the flashing guides. Zoom in on anything.
Point at a label or a wire to trace it. Click to keep it lit. Double-click to zoom.
Read the Stack H760 manual as text
BRAHMA H7: Specifications 1/3
| Product Name | Darkmatter® Brahma H7 |
|---|---|
| Product Category | Flight Controller |
| Processor (MCU) | STM32H743VIT6 ARM (480MHz) |
| Gyroscope (IMU) | DUAL ICM42688 |
| Barometer | DPS310 |
| On-Screen Display | AT7456E |
| Blackbox | SD CARD |
| USB Port Type | Type-C |
| Supported Flight Controller Firmware | BetaFlight (Default), iNav, Ardupilot, PX4 |
| Power Input | 2S-6S LiPo or Li-ion |
| Mounting | 30.5 X 30.5mm (4mm hole size) |
| Dimensions | 37mm (L) x 35.5 mm(W) x 8mm(H) |
| Weight | 9g |
BRAHMA H7: Specifications 2/3
| 5V Output | 9 groups of 5V output. The total current load is 3A. |
|---|---|
| 9V Output | 1 groups of 9V output, one +9V pad on front side. The total current load is 3A. Switchable On/OFF |
| 4v5 Output | 2 4.5V output, 500mA while connected from USB to connect receiver or other peripherals, Standard 3A on Battery |
| 3.3V Output | Supported. Up to 1A current load. |
| LED PADS | 2X NEO PIXEL LED PAD Groups |
| Buzzer | BZ+ and BZ- pad used for 5V Active Piezo Buzzer |
| Motors Supported | 10 Motors - 2X ESC Plug & Play [M1-M4] [M5-M8] - 2x Solder Pads M9-M10 |
| ESC Signal | M1 - M10 on top side |
| Digital Vtx | Plug and Play Port |
| Switchable VTX Power | You can turn on and off the VTX 9V supply from your RC to get faster GPS lock |
| Total PWM Outputs | 13 [10 Motors][2 Servo][1 LED] |
| CAN PORT | Yes |
| SPI BREAKOUTS | 2x SPI BREAKOUTS |
BRAHMA H7: Specifications 3/3
| BOOT Button | Press and hold BOOT button and power the FC on at the same time will force the FC to enter DFU mode, this is for firmware flashing. |
|---|---|
| RSSI Input | Supported. Named as RSI on the front side. |
| SmartPort | Use any TX pad of UART for the SmartPort feature. |
| UART | 7 sets (UART 1,2,3,4,6,7,8) |
| UART FLOW CONTROL | UART 7 SUPPORTS FLOW CONTROL CTS and RTS signaling |
| ADC | 6 ADC |
| Pin IO | 1x Pin IO for Relays, etc. |
| I2C | 2x Supported. SDA & SCL pads on front side. Used for magnetometer, sonar, etc. |
| OPERATING TEMPERATURE | -20°C TO 70°C.. |
| COUNTRY OF ORIGIN | DESIGNED AND MANUFACTURED IN INDIA |
VISHNU 60 PRO: Specifications
| Product Name | Darkmatter® Vishnu 60 PRO |
|---|---|
| Product Category | ELECTRONIC SPEED CONTROLLER (ESC) |
| Firmware | BLHeli_S /BlueJay ( JH_50 ) |
| Burst Current | 90A (7 Seconds) |
| Continuous Current | 60A x 4 = 240A |
| ESC Protocol | DSHOT300/600 |
| Power Input | 2S-6S BAT | IMPORTANT Please solder the low ESR capacitor between VBAT "+" and" -", and the VBAT “-” should be connected to the -ve side of the capacitor only. |
| Power Output | VBAT |
| Current Sensor | Inbuilt |
| Mounting | 30.5 x 30.5mm, 4mm hole size |
| Dimensions | 46 * 48.8 * 5.7mm |
| Weight | 14g |
| Supported Motors | PLEASE CHECK MOTOR MAX CURRENT DRAW FROM MOTOR MANUFACTURER’S MANUAL, SHOULD BE BELOW 70-80A. PROVIDED YOU ARE NOT PLANNING TO FLY ON 100% THROTTLE FOR 100% OF THE TIME WITH THE LARGEST PROP SUPPORTED BY THE MOTOR, IF THAT'S THE CASE LOOK FOR 60A OR BELOW. |
| Operating Temperature | -20 to 70 Degree Celsius |
| COUNTRY OF ORIGIN | DESIGNED AND MANUFACTURED IN INDIA |
DIMENSIONS
Front · Back · 30.5MM · 4MM · 37MM · 35.5 MM · 30MM · Side · 8MM · 1.6MM
DIMENSIONS
Front · Back · 30.5MM · 4MM · 46MM · 48.8MM
Flight Controller Layout
MCU STM32H743 · OSD Chip · Gyro 1 – ICM42688P · Baro – DPS310/DPS368 · Boot Button · ESC 1 (M1-M4) · Type C Port · SERVO 1 · CAN PORT · UART 4 · Buzzer · M1-M8 SOLDER PADS · AD1 · UART 7 · MICRO SD SLOT · LED 2 · DIGITAL VTX PLUG AND PLAY UART 4 R3 <> RX SBUS · SPI-3 BREAKOUT · ANALOG CAMERA · UART 7 FLOW CONTROL PADS · VTX + UART 8 · UART 3 · MOTOR 9 · I2C 1 (COMPASS) · UART 1 · ESC 2 (M5-M8) · SERVO 2 · Gyro 2 – ICM42688P · I2C 2 · ADC RSSI PIN · PIN IO · UART 6 (RX) · UART 2 (GPS) · MOTOR 10 · AD2 · LED 1 · CS1 · CS2 · *AD1 - Can be used as a external 2nd Battery ADC upto 6S. *1 : 10 voltage division. · *AD2 - Can be used as a external ADC for Airspeed Sensor.
Flight Controller – STANDARD CONNECTION PROTOCOL
GPS WITH MAG 1 · FPV CAM · 5V · SCL · SDA · B+ · B- · CAM · RX · 9V · 5V ACTIVE Buzzer · 4IN1 ESC 1 · GPS WITH MAG 2 · CAN DEVICE · CL · CH · VTX · 4IN1 ESC 2 · DARKLABS COSMOS LED DESIGNED BY AMIT · ELRS RX · SERVO 1 · SERVO 2 · RELAY · P+ · P- · LOAD · PMW3901 OPTICAL FLOW · CS · SCK · MOS · MIS · AD1 - Can be used as a external 2nd Battery ADC upto 6S. *1 : 10 voltage division. · AD2 - Can be used as a external ADC for Airspeed Sensor.
DUAL 4 in 1 ESC Plug and Play Connection
DUAL 4 in 1 ESC Plug and Play Connection · CURRENT ADC 1 · MOTOR 1 · MOTOR 2 · MOTOR 3 · MOTOR 4 · GROUND · VOLTAGE · TELEMETRY (RX8) · Motor 2 · Motor 4 · Motor 3 · Motor 1 · CURRENT ADC 2 · MOTOR 5 · MOTOR 6 · MOTOR 7 · MOTOR 8 · TELEMETRY (RX7) · Motor 6 · Motor 8 · Motor 7 · Motor 5 · ESC1 · ESC2
DUAL 4 in 1 ESC Direct Soldering Connection
Motor 6 · Motor 8 · Motor 7 · Motor 5 · CURRENT · MOTOR 8 · MOTOR 7 · MOTOR 6 · MOTOR 5 · GROUND · VOLTAGE · Motor 2 · Motor 4 · Motor 3 · Motor 1 · MOTOR 4 · MOTOR 3 · MOTOR 2 · MOTOR 1 · BATTERY + · BATTERY - · PLEASE USE COMMON BAT+ BAT- IF YOU ARE USING TWO BATTERIES, PLEASE DON’T POWER THE TWO ESCS WITH TWO BATTERIES SEPARATELY, KINDLY BRIDGE THEM. · ⚠️
4 in 1 ESC Motor Connection Numbering
Motor 2 · Motor 4 · Motor 3 · Motor 1 · THIS SIDE FACING UP · THIS SIDE FACING DOWN
10 SINGLE ESC CONNECTION
SINGLE ESC 7 · SINGLE ESC 8 · SINGLE ESC 1 · BAT - · 5V OUT · BAT + · SIGNAL · SIG GND · SINGLE ESC 2 · SINGLE ESC 3 · SINGLE ESC 4 · SINGLE ESC 5 · SINGLE ESC 6 · SINGLE ESC 9 · SINGLE ESC 10 · BATTERY
CONNECT BRAHMA H7 WITH IBUS RECEIVER
IBUS RECEIVER · *IF USING BETAFLIGHT KINDLY REFLASH WITH IBUS PROTOCOL SELECTED AND THEN TURN ON Serial Rx ON UART 6
STACK H760: Package Contents
• 1x BRAHMA H7 • 1x Vishnu 60 PRO • 2x 8Pin ESC FC Connector Cable • 8x Grommets • 1x 1000uF Low ESR Capacitor • 1x XT60 Battery Connector Plug • 1x 12 AWG Wire for Battery Connection • 4x M3 25mm Screws • 4x M3 Bolts • 1x Tin Container Box
HOW TO FLASH PX4 ON BRAHMA H7 (1/3)
- PRESS AND HOLD THE BOOT BUTTON and connect to PC and open STM32 Cube Programmer
- CLICK ON CONNECT
- Open the second menu item -> Erasing & Programming
- Before flashing, we need to do Full Chip Erase.
- Open the PX4 bootloader Darkmatter Brahma H7 from your PC.
- Start Programming and wait till the bootloader has flashed and then disconnect the USB and QGC.
HOW TO FLASH PX4 ON BRAHMA H7 (2/3)
- Open the QGroundControl application
- Open Vehicle Configuration
- Click on Firmware and then connect Brahma H7 to your PC
- Select PX4 Pro
- Click on Advanced Settings
- Select Custom Firmware File
- Click on OK to proceed to firmware file selection
- Select the Darkmatter Brahma H7 PX4 firmware file
- Wait for Firmware Flashing to Complete and Enjoy :)
HOW TO FLASH PX4 ON BRAHMA H7 (3/3)
WANT TO MAKE CUSTOM CHANGES TO THE FIRMWARE? · SCAN TO DOWNLOAD THE SOURCE CODE ALONG WITH THE FOLDER STRUCTURE TO CREATE CUSTOM PX4 FIRMWARE FOR Darkmatter® Brahma H7 BASED ON YOUR NEEDS · https://docs.px4.io/main/en/development/development.html · PX4 OFFICIAL DEV GUIDE :
HOW TO FLASH ARDUPILOT ON BRAHMA H7 (1/2)
- PRESS AND HOLD THE BOOT BUTTON and connect to PC and open STM32 Cube Programmer
- CLICK ON CONNECT
- Open the second menu item -> Erasing & Programming
- Before flashing, we need to do Full Chip Erase.
- Open the Brahma H7 Arducopter with bl from your PC.
- Start Programming and wait till the firmware has flashed and then open Mission Planner
HOW TO FLASH ARDUPILOT ON BRAHMA H7 (2/2)
- Open the Mission Planner application
- While connecting please select the MAVLink COM port to connect to Brahma H7
HOW TO CONNECT HERELINK WITH BRAHMA H7
Herelink SBUS Herelink ‘S Bus out 1’ to BRAHMA H7 RX6 (Serial 7) Herelink GRD to a BRAHMA H7 GND SERIAL7_PROTOCOL=23 (RCIN) SERIAL7_OPTIONS=3 (SwapTXRX - RX6 becomes TX6). Herelink UART connector Herelink RXD to the BRAHMA H7 TX1 (Serial 2) Herelink TXD to the BRAHMA H7 RX1 (Serial 2) Set SERIAL2_PROTOCOL= 2
HOW TO CONNECT COMPANION COMPUTER (PI) WITH BRAHMA H7
BRAHMA SETUP: Raspberry Pi on UART7 (T7 / R7 pads on the underside). T7 → Pi pin 10 (RXD), R7 → Pi pin 8 (TXD), G → Pi pin 14 (GND). Mission Planner → Full Parameter List: SERIAL1_PROTOCOL = 2 (MAVLink 2), SERIAL1_BAUD = 921 (921600). Official ArduPilot BrahmaH7 build (once released): SERIAL7. COMPANION COMPUTER SETUP: sudo raspi-config → Interface Options → Serial Port: login shell over serial No, serial hardware Yes. Power the Pi from its own 5V BEC (battery → BEC → Pi pins 2 and 6), never from the flight controller. Full guide: Docs → Connect a Raspberry Pi to the Brahma H7.
HOW TO FLASH BETAFLIGHT ON BRAHMA H7 (1/2)
- PRESS AND HOLD THE BOOT BUTTON and connect to PC and open BETAFLIGHT CONFIGURATOR
- ONCE IN DFU CLICK ON UPDATE FIRMWARE
- MAKE SURE FULL CHIP ERASE IS ON
- CLICK ON LOAD FIRMWARE LOCAL
- SCAN TO DOWNLOAD THE HEX FILE AND SELECT THAT
- CLICK ON LOAD FLASH FIRMWARE
- WAIT A BIT FOR THE ERASING AND FLASHING TO COMPLETE
HOW TO FLASH BETAFLIGHT ON BRAHMA H7 (2/2)
- CLICK ON CLOSE
- CLICK ON CLI FROM THE LEFT HAND SIDE MENU
- Enter the following in the command box, and enter save at last to save and reboot
HOW TO FLASH INAV ON BRAHMA H7 (1/2)
- ONCE IN DFU CLICK ON FIRMWARE FLASHER
- PRESS AND HOLD THE BOOT BUTTON and connect to PC and open INAV CONFIGURATOR
- CLICK ON LOAD FIRMWARE LOCAL
- SCAN TO DOWNLOAD THE HEX FILE AND SELECT THAT
- CLICK ON LOAD FLASH FIRMWARE
- WAIT A BIT FOR THE ERASING AND FLASHING TO COMPLETE
HOW TO FLASH INAV ON BRAHMA H7 (2/2)
- SELECT THE TYPE OF CRAFT YOU ARE MAKING
- SELECT THE UART & THE RECEIVER PROTOCOL FOR RX
- SELECT THE UART PORT FOR GPS
• Warranty Period: The STACK H760 comes with a 6-month warranty for any manufacturing defects from the date of purchase. • Proof of Purchase: Please retain and provide a copy of the purchase invoice for warranty claims. • Exclusions: The warranty does not cover : • Any physical damage to the product due to usage like water damage, tampered components • Burnt circuit due to wrong wiring or overloading. • Burning ESC due to spinning motors without propellers beyond 15% during initial testing for motor direction. • Burning ESC due to arming the drone without propellers in Angle mode and expecting it to stop spinning by lowering the throttle, which it will not, as the FC is trying hard to level but it can't, as you guessed it, there is no propeller. • Warranty Process: If a claim is made within the warranty period, we will examine the PCB for physical damage and the points stated above. If the product is eligible, we will provide a replacement at no additional cost and support you for your build. Your satisfaction and product performance are our top priorities. For any warranty-related inquiries, please contact us at +918017193277.
• Warranty Period: The STACK H760 comes with a 6-month warranty for any manufacturing defects from the date of purchase. • Proof of Purchase: Please retain and provide a copy of the purchase invoice for warranty claims. • Exclusions: The warranty does not cover : • Any physical damage to the product due to usage like water damage, tampered components • Burnt circuit due to wrong wiring or overloading. • Burning ESC due to spinning motors without propellers beyond 15% during initial testing for motor direction. • Burning ESC due to arming the drone without propellers in Angle mode and expecting it to stop spinning by lowering the throttle, which it will not, as the FC is trying hard to level but it can't, as you guessed it, there is no propeller. • Warranty Process: If a claim is made within the warranty period, we will examine the PCB for physical damage and the points stated above. If the product is eligible, we will provide a replacement at no additional cost and support you for your build. Your satisfaction and product performance are our top priorities. For any warranty-related inquiries, please contact us at +918017193277. · STACK H760 - 6 Months Warranty